Salt air sticks to your hands as the ferry hums toward the USS Arizona and the harbor turns mirror bright. You can’t bring a big rig, so you keep it simple with a HERO9/10/11, a spare battery, and a 128GB V30 card. You clip on a compact chest or wrist mount and a short selfie pole with quick release. You lock in 4K/60 Wide with HyperSmooth and high bitrate, then wonder if a polarizer will tame that glare just in time.
Key Takeaways
- Follow Pearl Harbor’s strict no‑bag rules; use a pocketable grip and stow extra gear in lockers or your car before security.
- Tripods are banned; use a compact wrist/chest mount or 10–12″ foldable selfie pole with a quick‑release for fast stow.
- Create presets at home: 4K/60 Wide, HyperSmooth On, High bitrate, ISO 100–1600, GoPro Color, Sharpness High, Low Light On.
- Add a 4K/30 Wide preset for sharper frame grabs and wide memorial views; slightly underexpose or lock exposure on mid‑tone concrete.
- Use a circular polarizer on the memorial boat to cut water glare; rotate it, then recheck exposure since the image will darken.
Pearl Harbor Camera Rules: Bags and Tripods
Before you even see the gleam of the Arizona Memorial’s white lines on the water, you’ll want to tighten up your camera kit. At Pearl Harbor, bags don’t go inside, so keep only what fits on your person and stash the rest in a locker or your car. Be sure you’re familiar with the official Pearl Harbor bag policy before you go, since even small purses and camera bags are restricted past security. Security moves fast and the quiet feels museum-like, with soft footsteps and distant harbor hum.
Tripods and any multi-leg supports are out. You’ll shoot handheld instead, or use a wrist strap or a compact pole mount that stays folded until you need it. Skip bulky bodies and extra lenses. A small mirrorless, a compact camera, or your phone will feel nimble on the dock and won’t draw a second look. You’ll thank yourself on the boat.
Pack a Small Pearl Harbor GoPro Kit
Strip your kit down to the essentials and you’ll glide through Pearl Harbor security without a second glance. Bring a HERO9, 10, or 11, one spare battery, and a 128GB V30 microSD. Add a compact wrist or chest mount so you stay hands free as the harbor breeze snaps flags and the boat engine hums. Skip big bags, tripods, and extra lenses. Prohibited items at Pearl Harbor include bags larger than a small clutch, so keep everything pocketable or on your person. Use a lightweight foldable selfie pole for simple group shots, plus a wrist tether for peace of mind. Pack a slim polarizer or magnetic filter adapter to tame glare off the USS Arizona Memorial’s rails. Toss in a microfiber cloth and a dry pouch for your phone. For corners, try a LED or Protune ISO 100–1600 with High Bit Rate. GoPro Underwater.
Pick the Best GoPro Grip for the Tour
You’ll want a compact handheld grip that slips into a deep shorts pocket and still feels steady when the harbor breeze kicks up near the USS Arizona Memorial. A foldable pocket selfie stick or mini tripod keeps you within tour rules and gives you smoother shots without waving a long pole like a conductor. Add a wrist strap or tether, because one slick hand and your GoPro could be headed for a surprise swim. If you’re visiting in a wheelchair, a short grip that’s easy to hold and stash makes it simpler to manage your camera while navigating accessible Pearl Harbor paths and ramps.
Compact Handheld Grips
- Go slim and pistol shaped, about 100–200 mm, so it fits a deep pocket between checkpoints
- Choose a built-in quick-release so you can stow it fast at security
- Look for a GoPro mount or 1/4-20 adapter for a tiny light or polarizer to cut glare on the Arizona Memorial
- Make sure your grip and camera setup stay small enough to comply with Pearl Harbor bag rules, since larger bags and bulky cases aren’t allowed through security.
Foldable Pocket Selfie Sticks
Pocket-stick selfie grips shine at Pearl Harbor because they stay small until you need a little extra reach. Choose a compact foldable pocket selfie stick that collapses to 10 to 12 inches, so it fits in your shorts pocket and respects the no-bags policy. Since even clear bags are not permitted at Pearl Harbor, a pocket-sized grip you can carry in-hand or in your pocket is especially useful. Go for a built-in GoPro mount and a wrist strap that locks. You’ll stay steady as crowds drift along the memorial walkways and the water flickers. Skip tripod legs. A small ball head or fixed-angle mount lets you tilt fast for wide landscape views. Extend it 18 to 36 inches to frame the USS Arizona Memorial and hold the camera above shoulders for horizons. In sun, pop a polarizer on and off, then tuck it in a folded microfiber pouch.
Build Pearl Harbor GoPro Presets at Home
Before you go, build a few Mode Presets at home so you can switch fast on the dock when the water’s glassy and the memorials feel hushed. Lock exposure and color for bright sun on white walls and deep shadows under ship rails, so your clips don’t shift mid-shot like they’ve had too much coffee. Then test your mounts and audio on a walk around the block, because a loose clamp and wind noise can ruin that clean harbor narration. Be sure your GoPro setup complies with the camera rules at Pearl Harbor so you can film without running into security or access issues.
Create Mode Presets
Dial in your Pearl Harbor GoPro presets at home, so once you’re on the dock with salt air in your face and boat engines humming, you’re shooting instead of scrolling menus with damp fingers. Build three go-to modes and pin them to the mode button or a front-screen favorite, then lock the touchscreen to dodge wet-hand taps. 1. Video: 4K/60, Wide, HyperSmooth On, High Bit Rate, ISO 100–1600, Color GoPro, Sharpness High, Lowlight On. 2. Photo: Wide, RAW or SuperPhoto, ISO 100–1600, White Balance Auto, Sharpness High. 3. TimeWarp/TimeLapse: 4K, Wide, 1x, 15x or 30x, interval 0.5–1s, Battery Saver alerts. Add an Underwater harbor low-light variant with ISO max 1600 and High Bit Rate. Run dry tests and name presets Pearl_Vid4K60 and friends before you board today. For smoother shooting and shorter lines, match your presets to the Pearl Harbor hours so you’re set before the visitor center even opens.
Lock Exposure And Color
Once you’ve pinned your main modes, the next win is getting the GoPro to stop “helping” every time the sun hits the harbor. In ProTune, set ISO Min 100 and cap ISO Max at 400 to 800 so bright water and white monuments don’t blow out. Then lock exposure on a calm mid tone, like the USS Arizona Memorial concrete, by holding the shutter or using the on screen menu on your model. You’ll hear the boats, but your highlights won’t pump. Keep White Balance on Auto unless you can hold a custom value through shade and glare. Set Color to GoPro, turn off Auto Lowlight in full sun, and save it as a named preset for quick swaps. Dial it in before arrival. If you plan to rely on the USS Arizona Memorial standby line, build and test your presets beforehand so you can start recording immediately when your group is called.
Test Mounts And Audio
Start at home and shake down your mounts and audio like you’re already stepping onto the harbor boat. Save two presets first: underwater 4K60 Wide with HyperSmooth and a memorial preset at 4K30 Linear or Narrow with a polarizer option. Then rehearse switching with wet hands. Lock the touchscreen and toggle presets with the front and back buttons. When you plan your angles, keep in mind the site’s photography guidelines so you only use your GoPro where photos are allowed.
- Do a mount-audio check: record 30 to 60 seconds on each preset from your short pole, chest mount, and hand grip with side lights.
- Play it back and listen for wind hiss and grip squeaks. Turn on wind reduction or plan an external mic adapter.
- Film shiny metal and a friend talking in bright light. Decide if a polarizer or quick black and white helps faces.
Choose 5K 4:3 or 4K/60 Video
Lean into the harbor’s scale by picking a video mode that matches what you’ll bring home. Choose 5K 4:3 at 30fps when you want the full sensor and crisp frame grabs. It’s perfect for later cropping wide views of the Arizona Memorial and the gray steel lines of Battleship Missouri. If you only have a few hours, plan your shots around what you can realistically see so your settings match the parts of Pearl Harbor you’ll actually visit.
Switch to 4K at 60fps when motion matters. You’ll get smooth pans on the ferry ride, spray on the bow, and easy slow‑motion of flags snapping in the breeze. Keep the lens on Wide for both so you capture ships, shoreline, and a bit of your handrail for context. Save presets for each mode so you can swap fast with wet fingers. Pack a fast SD card and enough storage for the big files.
Set GoPro ProTune for Harsh Pearl Harbor Sun
Dial in ProTune before you step onto the ferry, because Pearl Harbor’s sun loves to bounce off the water and flash across gray steel. You’ll hear gulls and camera shutters while the USS Arizona Memorial gleams. Lock your settings so highlights don’t blow out and shadows stay readable. Expect the structured USS Arizona Memorial program to include a film, boat ride, and time at the memorial itself, usually lasting about 75 minutes in total.
Dial in ProTune before the ferry: Pearl Harbor glare hits steel fast, lock highlights and keep shadows readable.
- Set ProTune bit rate to High and keep Sharpness High for crisp rivets, plaques, and flags in 4K/60.
- Cap sensitivity at ISO 100–1600 so bright decks stay controlled yet interior corridors don’t turn to mush.
- Leave WB Auto, pick GoPro Color, and keep HyperSmooth on for smooth handheld pans as the boat rocks.
If your GoPro offers LowLight in presets, toggle it for those contrasty moments under shade near the quiet marble names.
Use Pearl Harbor GoPro Photo Settings (RAW)
Switch your GoPro to RAW or SuperPhoto+RAW with the Wide lens, and you’ll hold onto the fine lines of the USS Arizona Memorial and the glittering water even in hard sun. You can then expose for those bright highlights, grab a quick test frame, and even pop on a polarizer so the metal and waves don’t glare back like they’ve got an attitude. Afterward, you’ll run a fast edit that pulls details out of the whites, and when midday skin tones get crunchy, a clean black-and-white conversion can save the shot. As you shoot, be mindful to compose from respectful photo spots and viewpoints so your images honor the solemn history of Pearl Harbor.
RAW Photo Mode Setup
Capture Pearl Harbor’s bright water and steel textures in a way you can actually shape later by setting your GoPro photo mode to RAW or SuperPhoto+RAW with the Wide lens and Sharpness on High. You’ll get a RAW file that keeps rivets and water texture intact. Set ISO Min/Max to 100/1600 and leave White Balance on Auto for color fixes later. Turn off the timer. Skip HDR or bracketing underwater or on a shuttle boat so motion stays clean. Use 4:3 when available, or stay wide, then step back and grab more harbor context. For indoor exhibits and ships’ interiors, borrow ideas from museum lighting tips and let your GoPro meter the scene, then slightly underexpose to protect bright screens and spotlights.
- Keep Wide lens for broad views.
- Shoot wider than you think. Crop later.
- Bring a polarizing filter or add a polarize tweak in post to cut glare.
Exposure For Bright Sun
Once you’ve got RAW turned on, bright Pearl Harbor sun stops being a problem and starts acting like a spotlight. Use RAW or SuperPhoto+RAW so the sky stays recoverable and the USS Arizona Memorial’s white surfaces don’t blow out. In ProTune, set ISO min/max to 100/1600 and Sharpness to High. You’ll keep detail in railings, flags, and the rippled water without ugly noise. Let tour boats drift through your frame for scale and sparkle too. Before you go, make sure you understand whether you need tickets for the USS Arizona Memorial so you can time your shots around your reserved visit window.
Cut glare with a polarizing filter, and save a red filter for underwater shots only. Shoot wider, not tight, so faces sit in context with sea and island. If skin still looks washed, skip heavy bracketing. Pop a little fill flash or lean into crisp black-and-white for instant drama.
Quick Editing Workflow
Dial in a quick RAW routine and Pearl Harbor’s bright water and white memorial walls start looking polished instead of blown out. Set your GoPro to RAW photo output (or SuperPhoto RAW if available) with Wide lens and ISO 100–1600 so you capture maximum detail and latitude for exposure recovery when editing Pearl Harbor’s bright,reflective scenes.. Shoot 4:3 to keep extra sky and rail, then crop to 16:9 later. You’ll hear the harbor hum on playback. Before you go, check the memorial’s Calendar of Events so your shooting plan fits around programs, boat departures, and any temporary closures.
- Start on Auto white balance, pull highlights, and trim exposure until marble looks clean.
- Add light clarity or texture, keep noise reduction moderate, and use a polarizer to tame water glare.
- Export a TIFF or ProRes master, then a small JPEG or MP4 for sharing.
Set TimeWarp and Time Lapse for the Harbor
Lock in a TimeWarp before the boat pulls away and the harbor starts doing its slow magic. Set it to 4K, Wide, Speed 15x, or 30x if traffic’s zipping. Keep Zoom at 1x and HyperSmooth on so the rail hum and wave slap don’t jitter your shot. If you’re out at dawn or dusk, flip on Low Light and let the softer glare work for you. For even smoother footage and easier framing, try to shoot during the least crowded hours when visitor traffic on the boats and around the memorial is lighter.
For Time Lapse, choose 4K Wide with 0.5 to 1 second intervals and set Format to Video. You’ll freeze boat paths, shifting clouds, and the shimmer around the USS Arizona Memorial. Use a preloaded battery and shoot 5 to 10 minute bursts. Clamp a compact pole to the rail at chest height and let the scene sweep by.
Use Shade Tricks for Better Faces
When the Pearl Harbor sun turns your friends’ faces into bright blanks, you can make shade do the heavy lifting. Set your GoPro wide, step back, and keep in mind that shadows can look like design, not a mistake. If you need a quick break while you tweak angles or review clips, nearby rest areas and seating around Pearl Harbor make it easy to sit, reframe your shot, and keep rolling without leaving the memorial zone for long.
- Put the sun behind or just above them. Tilt a cap so it cuts a clean line across the eyes and forehead.
- Wave a light scarf or pareo between lens and sun. Move it closer for softer shade or farther for crisp stripes.
- If highlights still blow out, flip on the GoPro’s fill light or a tiny LED. You’ll balance skin and keep that punchy contrast that sounds great with the harbor’s boat hum. Check the LCD, then adjust the hat angle until smiles reappear.
Shoot Wider Scenes: Skip Tight Close-Ups
Shade fixes faces up close, but at Pearl Harbor the bigger story sits all around them. Switch to wider lenses, like GoPro Wide or 5K 4:3, and step back. The bright Hawaii sun and shiny water can bleach skin fast, so keep people at arm’s length or farther and let the memorial, horizon, and harbor do the talking. Expect a fair amount of walking at Pearl Harbor, so plan for longer, smoother moves instead of short, static clips. Move slow with a gentle pan or a follow shot on a pole. You’ll hear the water slap the dock and catch the white structure against deep blue.
| Shot | What you include |
|---|---|
| Wide establishing | Memorial, horizon, wake |
| People walking | Bodies, rails, water |
| Quiet pause | Hands on rail, island |
| Slow pan | Flags, clouds, visitors |
In editing, try black-and-white to tame sweat shine and keep tones honest too.
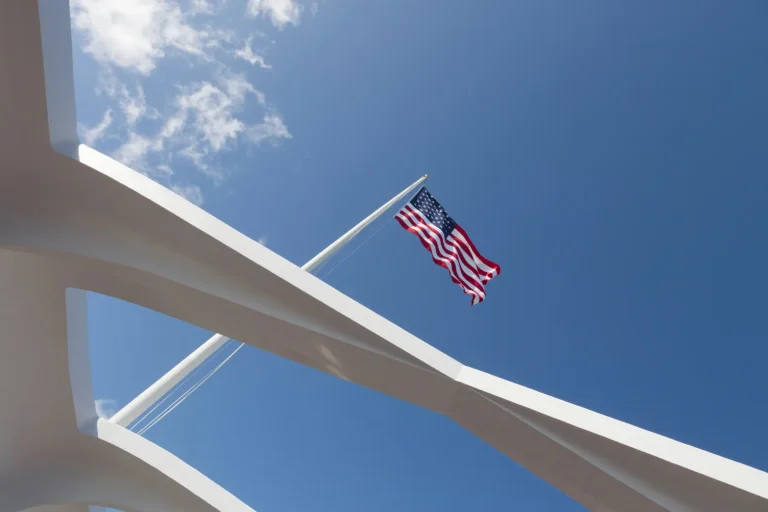
Cut Glare at USS Arizona With a Polarizer
Cutting glare at the USS Arizona starts with twisting a circular polarizer until the water stops acting like a mirror. Mount it on your GoPro dome or flat port, or snap on a polarizing attachment before you board the memorial boat at Pearl Harbor. As you frame the white bridge and the rust-streaked hull below, rotate the ring and watch the surface sheen fade, often strongest when you’re 90° to the sun. If you don’t already have USS Arizona Memorial tickets, secure your timed entry first so you can focus on dialing in your polarizer instead of scrambling for last-minute access.
- Pair the filter with 4K60 and Bit Rate: High so names on plaques stay crisp.
- Expect a slightly darker image, keep ISO 100/1600 and check exposure on the deck.
- Skip stacking extra glass to avoid ghosting, because distant shots don’t need drama.
You’ll see deeper blues and calmer highlights.
Optional: Underwater Preset for Oahu Snorkeling
Back on Oahu’s blue water, your GoPro can go from calm memorial reflections to reef action in a few taps. Preload an underwater preset on land, then lock the touchscreen so stray bubbles don’t change settings. For snorkeling clips, run 4K at 60fps, Wide, HyperSmooth On, Bit Rate High, ISO 100–1600, Sharpness High, and Color GoPro for crisp underwater videos of parrotfish and rippled sand. Between sessions in the water, you can review your clips while learning more about aviation history at the nearby Pearl Harbor Aviation Museum.
Want motion trails? Switch to TimeWarp at 4K, Wide, Zoom 1x, Speed 15x, or 30x when the current picks up. Top off the battery or pack spares. For stills, shoot RAW or SuperPhoto and stay within a few feet. Add a dome port for over-under shots, plus side lights or a red filter past 10 feet in calm lagoons.
Frequently Asked Questions
Can I Use My Gopro on the USS Arizona Memorial Boat Ride?
Yes, you can use your GoPro on the USS Arizona Memorial boat ride, Boat permitted, but you’ll need to keep it handheld and pocketable. Don’t bring tripods, big bags, or extra lenses; expect glare, bright sun.
Are External Microphones Allowed for Narration During the Pearl Harbor Tour?
Maybe, but you must check current Pearl Harbor rules, Audio Allowed varies by area. You can’t bring big rigs or bags, so use GoPro mics or a tiny lav/phone, then record clean voiceovers later at home.
Where Can I Securely Store Gear While Walking Between Pearl Harbor Sites?
About 70% of visitors get turned away with oversized bags, so store gear in Secure lockers at nearby visitor centers or tour operators, or use your hotel’s front desk/safe, leaving cases locked in your car’s trunk.
Is There Reliable Wi‑Fi or Cell Service for Gopro App Control Onsite?
You won’t get reliable Wi‑Fi or cell service for GoPro app control onsite; expect Limited connectivity. Pair and set presets beforehand, keep your phone close, and use camera buttons. Turn off radios, carry spares.
What Are the Best Times of Day to Avoid Crowds for Smoother Gopro Footage?
Want smoother footage without the crush? Go in Early mornings at opening, or return 3–5 PM for crowds and softer light. Shoot Tuesday–Thursday, don’t arrive 11–1:30, and buffer 30–60 minutes around ceremonies and ship movements.
Conclusion
You’re ready for Pearl Harbor with a GoPro kit that fits in one small bag and moves fast. You’ll clip on a chest or wrist mount, then swap to a pocket pole for the Arizona platform. Your 4K/60 preset keeps the harbor smooth, even in boat wake and trade winds. Use shade for faces and a polarizer for the hard sun glare. The quiet water will look a million miles deep.