You might not know that Pearl Harbor’s strict no-bag rule can shape your whole shot list before you even touch the shutter. You’ll want to arrive early for the USS Arizona program and claim a spot on the museum terrace or rooftop while the water still looks like glass and the plaza feels quiet. Keep your kit lean, since tripods and big rigs trigger paid storage. Pick the left side on the shuttle, too, and you’ll see why…
Key Takeaways
- Don’t bring bags; security inspects items, and on-site storage (~$5) is available for prohibited gear.
- Tripods are prohibited; carry only a handheld camera or phone, and avoid multiple lenses or frequent lens swaps.
- Arrive 30–45 minutes early; timed tickets release frequently, and early light at opening gives calmer scenes and fewer crowds.
- Best views: outdoor plaza wide shot, museum terraces at opening, and left-side shuttle seats outbound for the memorial.
- Ford Island has base-style ID checks and a strict no-photo zone on Admiral Clarey Bridge; follow all crew announcements and rules.

What Photo Rules Apply at Pearl Harbor?
Before you even lift your camera toward the bright water and white marble of the USS Arizona Memorial, you’ll want to know the rules because Pearl Harbor keeps security tight. You can take photos through the USS Arizona Memorial program, from the hush of the theater to the open-air platform where the water taps below. Security will inspect what you carry, and you can’t bring bags of any size inside, so use pockets and move fast.
Stay alert for one big no-photo zone: the Admiral Clarey Bridge to Ford Island. You’ll hear a clear announcement before you cross, so don’t test it. If you head to Ford Island sites, you’ll need an authorized tour and base-style clearance. Expect IDs, vehicle checks, and stricter limits.
What Camera Gear Can You Bring (No Bags)?
Pack light and keep it simple, because Pearl Harbor runs a strict no-bags setup that shapes what you can shoot with. You can bring a phone, wallet, keys, and a small camera that fits your hand. Entry staff will inspect compact cameras, camcorders, and mirrorless bodies with one lens, so keep your kit tidy and ready. Leave the DSLR tower and spare lenses at home. Tripods are off the list too, even the travel kind. If you want extra reach or low glare on the water, try a modern phone plus a clip-on polarizing filter. Need bigger gear for later? Use the paid storage on site, about $5, before you start your Passport to Pearl visit. You’ll hear gulls and feel warm breeze outside.
How Do You Carry Gear in Pockets All Day?
You’ll want pocket-friendly shorts or hiking pants with deep side pockets so a phone, wallet, and a spare SD card ride secure while you walk past the quiet water and the low hum of tour chatter. Keep your loadout small with a compact camera and one thin lens, then tuck cash and ID into a slim zip organizer or a tiny waterproof pouch so sweat and surprise drops don’t ruin your day. Spread the weight between front and back pockets and keep quick-grab items like sunglasses and a lens cloth up front so you breeze through checks without doing the pocket pat-down dance.
Choose Pocket-Friendly Clothing
Dress like a minimalist and let your pockets do the heavy lifting as you walk the Pearl Harbor paths in the warm trade winds. For visiting Pearl Harbor, pick shorts or pants with deep side pockets, ideally zippered, so your phone, slim travel wallet, folded selfie stick, spare SD card, and microfiber cloth stay put while the harbor breeze snaps flags nearby. Use a secure phone case or small zip wallet for ID, cash, and a card since bags aren’t allowed and the $5 bag check feels like an extra stoplight. Split weight between pockets. Keep phone and wallet up front, then tuck batteries, cards, or cloth in rear or cargo pockets to prevent sagging. Choose deep zippers or a belt pouch for arrival.
Use Minimal Pocket Loadout
A few well-chosen items can cover the whole Pearl Harbor visit without turning your pockets into a junk drawer. Choose deep side pockets or zip cargos and go bag-free. Bring a phone or small compact camera, a clip-on polarizer, one spare battery, and one SD card. Split them into separate pockets so inspection stays smooth.
| Essential | Quick payoff | |
|---|---|---|
| Phone/camera + strap | Right | Fast frames at USS Bowfin |
| Battery + SD in clear bag | Left/waist | Easy to present at security |
Wear a wrist or neck strap so the camera’s anchored. Slide a folded selfie stick into a pocket and keep hands free on the boat. Keep ticket, cash, ID, and meds in a pouch. Balance weight across sides so nothing bumps your leg.
Prevent Sweat And Drops
Because Pearl Harbor runs warm and breezy, pocket-carried gear can turn slick fast, especially when you’re stepping onto the boat and the water glare pulls your attention. Make sure your shorts or pants have zippered pockets, since no bags are allowed onsite, and try this routine:
- Seal your phone, SD card, and spare battery in tiny plastic bags.
- Line a pocket with a microfiber cloth so it soaks sweat, not your electronics.
- Clip on a light neck lanyard or wrist strap so your camera hangs while you read signs.
- Keep the extra battery and a small cloth in another pocket, then rotate batteries during quick photo bursts.
Wipe hands and gear with a quick-dry towel, reseal items, and keep moving.
Where Are the Best Visitor Center Photo Spots?
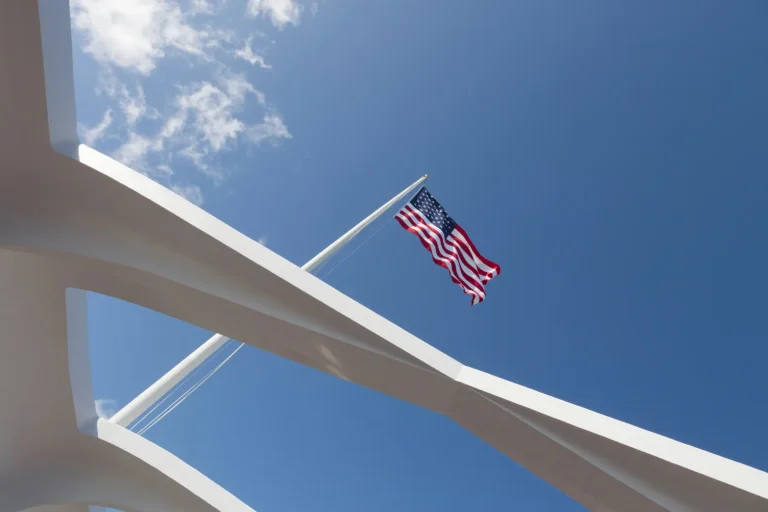
Start at the outdoor plaza facing the USS Arizona Memorial and you’ll get classic wide shots of white lines over blue water, especially with an ultra-wide lens and a polarizer to cut the glare. Then head up to the museum terraces or rooftop areas at opening time around 7am so you can catch calm reflections and dark battleship silhouettes before the sun turns sharp. When you step inside the exhibits, slow down for close detail shots of murals and artifacts, and try black-and-white so the bright ambient light doesn’t wash out faces.
Visitor Center Vistas
Step onto the USS Arizona Memorial viewing platform and you’ll see why photographers linger here, camera in hand, as the harbor water glints and tour voices soften. From this spot at Pearl Harbor, you get a clean line to the sunken battleship and the white memorial hovering above it.
- Shoot from the museum overlook for a classic, steady frame across the water.
- Climb the upper terraces east of the theater and go ultra wide, 8–15mm, to pull in Ford Island too.
- Come early or late for richer color and shadows. Skip high noon or you’ll blow out highlights.
- Pack light. Big bags, tripods, and long lenses may get stopped, and staff will inspect gear. A circular polarizer cuts glare and deepens sky when sunny.
Museum Exhibit Details
The harbor views may grab you first, but the Visitor Center museums reward anyone who turns the lens inward. Inside Pearl Harbor, aim your ultra wide 8–15mm or 12–50mm equivalent at the big murals and photo walls so you capture the whole story, not just a face. Glass cases bounce light, so add a polarizer, keep ISO moderate, and brace for slower shutter speeds since tripods aren’t allowed. If sun glare washes colors, plan a black-and-white edit later.
| Spot | Quick tip |
|---|---|
| Mural panels | Go ultra wide. |
| Artifact cases | Polarizer, slow shutter. |
| Window-lit displays | Shoot B&W. |
| Theater entrance | Arrive 10 minutes early. |
Timed tours run 30 minutes plus the boat transfer, so shoot exhibits before you line up. Travel light. No bags or big cameras.
How Do You Time the USS Arizona Program?
Often, the smoothest USS Arizona Memorial visit comes down to timing your day like a well-paced photo walk. Arrive at the Arizona Memorial Visitor Center 30 to 45 minutes early because tickets and lines move fast, every 15 minutes. Tickets are free, but they can vanish, so book online or grab same-day timed passes first thing.
Time your USS Arizona Memorial visit like a photo walk: arrive 30–45 minutes early and snag free timed tickets fast.
- Check wind and boat status if it feels breezy; rides can pause near 18 knots.
- Show up at the theatre 10 minutes before your slot.
- Watch the 30-minute film, then follow staff to the shuttle boat.
- Budget 60 to 90 minutes total, including transit and about 15 minutes on the memorial, so the rest of Pearl Harbor stays stress-free and hear water lap softly.
Which Side of the Boat Is Best for Photos?
Timing gets you on the shuttle without stress, but your seat decides what ends up in your frame. On the ride to the USS Arizona, claim the left side for the cleanest angles as the memorial grows larger over the chop. If you shoot ultra wide, slide to the middle-left where the deck curves and railings stop blocking the waterline.
On the return trip, pivot right to line up the USS Bowfin and the dry-dock view of the USS Missouri. Seats at Pearl Harbor run first-come, first-served, so show up early and commit. Keep your feet off any restricted bridge areas and follow crew calls. You’ll get better photos and avoid being that person. Listen for engine hum and watch light bounce off steel.
What Shots Can You Get in 15 Minutes?
Move fast but shoot calm because your 15 minutes on the USS Arizona Memorial will disappear the moment you hear the shuttle engine idle again. In Pearl Harbor, think wide and composed, not face close-ups. Use an ultra-wide view to hold the white arches, the open sky, and Ford Island in one frame.
Move fast, shoot calm, your 15 minutes vanish fast. Go ultra-wide: arches, sky, and Ford Island in one composed frame.
- Step inside and frame the interior arches, then wait for a quiet beat.
- Look down for the oil “tears” shimmering on the water like dark coins.
- Shoot a straight-on memorial wide shot from the center rail, landscape only.
- On the ride back, grab the left-side seat early for angles on the USS Arizona hull and reflective patches.
Skip tripods and lens swaps. A zoom keeps you nimble.
How Do You Expose for Harsh Hawaii Sun?
Usually the light at Pearl Harbor hits like a clean white spotlight, and the USS Arizona Memorial can go from crisp to blown out before you’ve even found your footing on the deck. Meter for the highlights on that bright white memorial and ride the exposure to the right without clipping. Shoot RAW so you can pull it down later slightly and recover surface texture. Avoid tight portraits in direct sun. Go wider and include a patch of shade or dark water to calm contrast. If someone’s backlit, add fill flash or a small reflector. When color turns pale, boost local contrast or switch to black-and-white.
| Scene | What you meter | Quick save |
|---|---|---|
| White memorial | Highlights | Pull down in post |
| Backlit faces | Highlights | Add fill flash |
When Should You Use a Polarizer at Pearl Harbor?
When the midday sun turns Pearl Harbor into a mirror, you’ll want a circular polarizer to cut the sparkle off the water and tame reflections so the USS Arizona and the Bowfin look crisp from the boat. You’ll also reach for it when you frame the USS Arizona Memorial’s bright white surfaces against the harbor, because it can deepen the blue sky and add clean contrast. Just rotate the filter as you shoot, especially with an ultra-wide lens, so the sky doesn’t get weirdly dark in one corner.
Midday Water Glare Control
On bright Pearl Harbor afternoons, the water can turn into a giant mirror that bounces light right into your lens. From 10am to 2pm, screw on a circular polarizer and watch the Harbor shift from silver glare to deeper blue, with hints of submerged shapes near the USS Arizona. You’ll hear tour boats hum by.
- Stand so the sun sits on your left or right for the strongest cut in reflections.
- Rotate the filter while you look through the viewfinder until the glare drops about 1 to 2 stops.
- Pair it with a slightly faster shutter and low ISO so white structures stay crisp and not blown out.
- If the sky goes darker, nudge exposure or bracket a few frames for clean memorial whites.
White Memorial Surface Reflections
In the hard midday sun, the USS Arizona Memorial can look like a giant white light bulb floating over the harbor. Clip on a circular polarizer and rotate it until the highlights on the memorial and the water calm down noticeably. You’ll see the white panels gain texture, like concrete instead of blank paper, and the Hawaiian sky turns a deeper blue.
Skip the polarizer if you’re shooting ultra-wide at 8–15mm since the sky can go patchy. Try black-and-white instead out here. If you’re close to the memorial, add a small fill flash or step into shade so faces don’t sink into shadow. Take the filter off at dawn, in low light, or on gray days. You’ll need light for sharper shots near Battleship Missouri.
When Do Flash or Black-and-White Help Most?
Often, the light at Pearl Harbor feels like it’s bouncing from every direction, especially off the bright water and the white USS Arizona Memorial. When you’re shooting people on the boat or near the rail, a small fill flash helps. It lifts eye shadows and tames glare at under 10 to 12 feet, even if you’re in shorts with deep pockets.
At Pearl Harbor, light ricochets off water and the Arizona Memorial, use a small fill flash to lift faces within 10–12 feet.
- Use fill flash for portraits in midday sun and step back for a wider frame.
- Skip flash for wide memorial scenes. It won’t reach and can look flat.
- Switch to black-and-white when the memorial pops against a deep blue sky or shiny water.
- Add a polarizer, then convert to monochrome for darker skies, richer midtones, and less harbor sparkle.
Frequently Asked Questions
What Are the Best Months or Times of Day for Fewer Crowds?
Go in September–November or February–May, especially September–October or April–May, for lighter crowds. Choose Early mornings: arrive 30–45 minutes before opening and catch first boats. If you can’t, try 3:00–4:30pm weekdays. Tuesday–Thursday beats weekends and holidays.
Do I Need a Permit for Tripod, Gimbal, or Commercial Photography?
Permit? Unnecessary for casual photos, but you can’t bring tripods, and big gimbals may get refused. If you’re shooting commercially, coordinate ahead and expect permits and clearance, especially for Ford Island attractions.
Are Drones or Aerial Photos Ever Allowed Near Pearl Harbor Sites?
Better safe than sorry: you can’t fly drones or take private aerial photos near most Pearl Harbor sites; Drone restrictions, TFRs, and military airspace apply. You’d need rare written FAA/military authorization, or use approved viewpoints/tours.
Is Photography Allowed Inside the Museums and on the Submarines?
Yes, you can take photos inside most museums and aboard the USS Bowfin submarine. Practice Museum Etiquette: you can’t use flash where posted, you won’t bring tripods, and you’ll follow staff instructions and exhibit signage always.
Can I Photograph Active-Duty Personnel or Ships From the Visitor Areas?
Yes, you can photograph active-duty personnel and ships from public visitor areas, like catching history in a frame. Respect boundaries, don’t interfere or enter restricted zones, avoid sensitive shots, and comply if security asks.
Conclusion
You’ll shoot more and stress less at Pearl Harbor when you travel light and show up early. Give the USS Arizona program 60 to 90 minutes, then move fast once you’re on the memorial. The white walls and dark water beg for clean exposures in the hard sun, and a polarizer can tame the glare. One fact sticks: 1,177 sailors died on the USS Arizona. You’ll hear quiet footsteps, salt air, and shutters click.